Wednesday, April 24, 2013

How Crabapple Builds Your Stone Retaining Wall


Stone Retaining Wall with Steps
It’s hard to have an al fresco dinner party on a slant. For properties with a slight slope, a decorative stone wall might be the right landscape solution to straighten up the sloping land into two flat areas. This creates two levels in order to provide one flat surface for lawn games like badminton or croquet, and a second level area for dining, relaxing and outdoor living. 

Ask your Crabapple LandscapExperts Rep if the sloped area can be graded with a bobcat, flattening it out by means of a low drop (17 to 20 inches) that can also be used as seating. A low sitting wall helps define the space as well as provides additional seating for outdoor entertaining. Low retaining walls also function as a backdrop for plantings and colorful flowers.                  

Stepped Terraces
If the grade is more sharply sloped, perhaps a series of 2 or 3 low retaining walls can create an attractive series of level terraces. Call the LandscapExperts for retaining wall issues relating to erosion, water seepage, soil texture, tree root zones or local restrictions that require expert know-how.

The LandscapExperts Team favors decorative stone, brick or block rather than landscape timbers for permanence and long-term ease of maintenance.  We follow three steps in laying out a stone wall:

Choosing the stone
Jigsaw Puzzle Stone Wall
The type of stone determines what the wall will look like when finished. Round, flat, squared or irregular rocks, new or old stone, or a variety of mixed stone will be fit together like a jigsaw puzzle, creating an attractive finished wall. Before beginning, theLandscapExperts blend all of the types of rocks together to ensure an even or uniform composition. 

Next we separate out the capstones, (wide, flat stones for the top of the sitting wall), and reserve them for finishing the top.

Steps
Layout - will the most appropriate wall be straight or curved? Get our expert opinion
Setting the foundation – digging out a trench in which we lay the foundation
Thickness of the foundation – is based on the height of the wall
Width of the foundation - should be a little wider than our stone wall
We mix and pour the concrete, make sure it is level and smooth with a trowel
We let the foundation set (cure) overnight, and begin building the next day

Calculating How Much Stone?
To determine how much stone is needed, the formula we use for # of cubic yds. = L' x W' x H'/27. In other words, multiply the proposed length, width and height of the sitting wall in feet and divide by 27 to determine the number of cubic yards of stone needed. Convert this to tons instead of cubic yards by multiplying by 1.5. 

Building
Block Curved Retaining Wall
Building on the foundation, we lay stones along the extent of the wall from one end to the other, choosing stones that fit together like pieces of a jigsaw puzzle. It is best not to lay one stone upon the other, but to interweave or interlay them so that a top stone covers the gap between 2 or 3 stones in the row beneath, exactly like bricks are set in a brick wall.
Small stones are useful for filling gaps between the rocks and stabilizing them.
Backfill soil also can be used to make planting pockets for ferns or wallflowers.

Finishing
When the desirable height of the wall, less the thickness of the capstones, has been reached, it is time to finish it off laying on the capstones from one end to the other. Once all the capstones in place, we backfill with a sandy topsoil and plant with turf or herbs and flowers.  Crabapple LandscapExperts welcome you to level outdoor living!


Wednesday, April 17, 2013

20 Top Blue Flowers for Atlanta Landscapes - Choosing Blue Flowers for the Garden

Blue is an elusive color for flowers in the landscape, but Crabapple LandscapExperts have developed quite a list of Blue Flowers for Atlanta Landscapes starting with fall-planted spring-flowering bulbs.

Fall planted Spring Flowering Bulbs
Ipheion Rolf Fiedler Star flower
'Rolf Fiedler' is the bluest of the Blue Star Flowers, which include the straight species that ranges from white through blue, as well as the silvery-blue variety 'Wisley'. Other blue flowering bulbs include thhe multi-flowered Festival Hyacinths, diminutive Grape Hyacinths, later blooming Spanish Hyacinths and the long-lasting blue Anemones.


Spring Annual Flowers
Blue Bachelor Button 
Next comes the Spring annuals that self-sow after a season or two of planting. Select only the Blue Bachelor Buttons, as they also come in pink and white shades. Another spring annual is Nigella also known as Love-in-a-Mist, a romantic name for its ferny, filmy cloud of finely cut foliage.


Spring Perennials
Mertensia virginiana, VA Bluebells
Blue Spring perennials begin with early flowering Lungwort or Pulmonaria, the ephemeral Virginia Bluebells and the lilttle native Crested Iris 'Powder Blue Giant'.

Irises of Early Summer
tall bearded Iris
Early summer brings the Iris family- including Siberian Iris and Tall Bearded Iris in shades of blue to navy. A little Iris is the native Crested Iris, which enjoys a moist, woodland soil.


Many Blue Flower Choices in Summer
In the summer time light blue plumbago, the herb Borage has sky blue flowers that can be floated on lemonade or frozen in ice cubes. An almost-blue is Lavender, in bloom in Late April to May. A powder blue flower is the tender  the smallest iris Blue-eyed grass or Sisyrinchium, Blue Flax Geranium Rozanne, and the stately spires of Delphinium -- treated as a cool season annual in #Atlanta.

Morning Glory
Blue Vines
Blue flowered vines include Passion Flower and Morning Glory, shown at left.

Blueberries
Let us concentrate on Blueberry bushes in July.

Blue for Autumn
In fall blue Asters and blue Ageratum - also known as  floss flower - prevail, along with the blue fruits of the semi-rampant porcelain berry vine.

Winter Blues
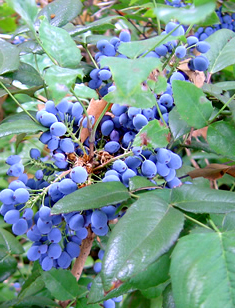
Oregon Grape Mahonia berries
In winter we must be satisfied with the blue-green foliage of Arizona Cypress and Blue Boy Holly, along with the blue berries of Oregon Grape Mahonia, pictured at right.

Blues add depth to the landscape pallette.


Wednesday, April 10, 2013

Crabapple Green Scene Events - April is National Garden Month


 April is National Garden Month®, and everyone’s thoughts are turning to landscapes, flowers and vegetable gardens.  Annual Earth Day is celebrated on April 22.  Let Crabapple LandscapEXPERTS suggest several ways to spread the “spirit of gardening” in the neighborhoods or the communities you manage.

Green Scene Custom Garden Events Tailored for your neighborhood
The Crabapple LandscapEXPERTS Team is throwing a garden party just for you and your neighbors! Talk to your Rep and we’ll schedule an exclusive event personalized to your HOA or Landscape Committee and we’ll bring the (crab)apple donuts, (crab)apple cider and fresh, aromatic coffee, too. 

Let Crabapple plan a fun, hands-on workshop for your committee that offers a chance to meet, greet and grow. Choose from topics like
·         Container Gardens
·         Host a community Plant Swap
·         Pot en Fleur Baskets
·         Veggie Farm-to-Table Grow-fest
·         How to Plant a (Crabapple) Tree

Seasonal workshops such as 
·         Spring Success with Tomatoes, America’s Favorite Vegetable
·         Plant Parenthood (propagating more plants from one)
·         Pumpkin Carving (parents with kids over 6)
·         Natural Wreath Making
Make then take home your creation, courtesy of Crabapple LandscapEXPERTS.  

Cooperative Extension Classes  
Look to the local Cooperative Extension Agent and Extension Master Gardeners for garden and landscape classes. http://www.caes.uga.edu/extension/fulton/anr/index.html

Specialty Plant Sales
Many plant societies have Plant Sales and Private Garden Tours during April, such as the Azalea Chapter (Atlanta) of the American Rhododendron Society http://azaleachapter.com/Plant%20Sale%20Flyer%202013.pdf Plant Sale at Oak Grove United Methodist Church parking lot (off LaVista) Saturday, April 13
Or
 Georgia Native Plant Society Spring Plant Sale Saturday, April 20 at McFarlane Nature Park, Atlanta Country Club, Marietta, GA http://www.gnps.org/plantsale/Plant_Sale_13/Plant_Sale_Flyer.pdf
Or
Georgia Perimeter College Native Plant Botanical Garden Lunch and Learn Fridays and plant sales  http://depts.gpc.edu/~decbt/
Garden Tours of private gardens provide ideas
The GA Perennial Plant Society Intimate Garden Tour May 4-5 http://georgiaperennial.org/events/2013_tour_1/index.htm
The Atlanta Botanical Garden Connoisseurs Garden Tour May 11-12 http://www.atlantabotanicalgarden.org/events-classes/events/gardens-connoisseurs
Decatur “Gardens of Eating” Garden Tour April 27-28 http://decaturgardentour.com/

Community Gardens
If there is a Community Garden in your community, after the neighbors get done swapping tomatoes and zucchini, consider PAR Plant a Row for the Hungry.
Help those in need by growing extra vegetables in the garden this summer. Plant a Row for the Hungry is a national campaign, sponsored by the Garden Writers Association, to help feed hungry families. The concept is simple. Plant extra produce in your garden and donate it to a local food shelf, shelter, or soup kitchen. It's a great way to help your community, and if you include your kids or grandkids, a valuable life lesson.  Contact the local food shelf or agency to determine the best type of produce to grow and when and where they most need it

Organize a Poetry Circle
Every one of us has stories to share. For a change, why not share them in the form of poems? Like gardening, writing and reading poetry helps us explore and share our individual style. Poetry encourages precise use of words as we home in on what we wish to communicate.

MORE Crabapple Ideas for celebrating National Garden Month in your community:
Start a Neighborhood Garden Club
Get up a group to visit your local farmers' market.
Compliment a neighbor on his or her garden.
Get together with neighbors to purchase spring flowering bulbs in bulk quantities.
Volunteer to plant and maintain a garden at your town library, school or fire station.
Interview an elder on NPR Story Corps to learn what foods his or her family grew when he or she was a child.
Seek out neighbors from various ethnic groups to learn about their native cuisine and gardening techniques.
Celebrate other important "green" holidays: Earth Day (April 22) and National Arbor Day (April 26).
Take a Field Trip to the Atlanta Botanical Garden (Atlanta), the State Botanical Garden of Georgia (Athens) or Gibbs Garden (Ball Ground). 
Share your garden's bounty with a neighbor or with the local Food Bank.
Have fun doing a gardening project with a child.
Deliver houseplants or flowers to a nursing home or children's hospital.
Donate past issues of gardening magazines to your library, or buy the library a gift subscription.

Wednesday, April 3, 2013

Mulch Madness: Mulch Volcanoes are Proven Tree Killers


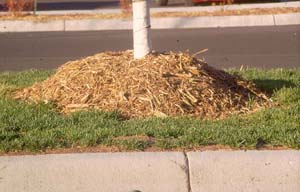
Bad Practices: Classic Mulch Volcano (UMN.edu)
 "If a little is good, more must be better" does not hold true with everything. Fertilizer for example, where a little is beneficial but too much can burn plant roots. And while rings of mulch surrounding woody ornamentals serve to (1.) protect the trees and shrubs from string trimmers, (2.) maintain moisture around the root zone, and (3.) visually set off specimen plants in the landscape, any good thing can be carried too far.  Crabapple LandscapExperts warn that "mulch volcanoes" are not the way to go when mulching woodies.

Easy Does It
Too Much Mulch
"Mulch volcanoes" are a protective ring of mulch gone mad. Heaping cones of mulch packed around the trunk of trees and shrubs and pushed right up against the bark is the wrong approach. Bark is the tree's outermost protective layer, and needs to be exposed to air. Moisture from constantly-moist, piled up mulch softens bark causing it to be susceptible to several bad actors, including:
  • Wood-boring insects living in the mulch can tunnel through to the softened, partially-decomposing bark and gain easy-access to the greenwood or vascular tissues beneath the bark, introducing vectors of disease. 
  • Diseases such as harmful fungal canker diseases (rots), bacterial attacks or virus diseases can more easily penetrate to the interior of the plant when the bark remains continually moist. 
  • Critters such as mice and meadow voles can tunnel through the mulch and chew through the outer bark to reach the tasty living inner bark. This will cut off the flow of water up from the roots and nutrients down from the leaves, causing the plant to die.
  • Roots tend to migrate up toward the top of the mulch layer during rainiy periods, only to dry out when summer drought sets in.
On the Other Hand
 In times of drought, such a thick "volcano" of mulch a foot high can prevent rainfall or irrigation water from reaching the root system in an "umbrella" system, causing additional plant stress.

LandscapExperts Recommendations

Mulch Ring Size
A mulch ring can be a radius about 2 to 3 feet out from the trunk, or can go all the way out to the canopy's drip line. This ring provides a protection zone for the roots as well as for the trunk.
Depth
Two to three inches of organic mulch is plenty, since thicker layers inhibit the exchange of oxygen between the tree roots and the atmosphere, since roots need air as well as water to remain healthy. Leave a space 2 - 3 inches between the bark and the beginning of the mulch for good air circulation.
Material
Compost, well-rotted wood chips and pine straw work well and contribute to the organic content of the soil as they break down over time. Crabapple LandscapExperts do not recommend rubber mulches or dyed mulches because of reduced air and moisture supply and the release of toxic chemicals. Neither should fresh wood chips or sawdust be used, since they temporarily rob the tree of nitrogen during the process of decomposition.

Contact your Crabapple Rep to discuss using proper mulch rings to highlight specimen trees and shrubs in the landscapes you manage.

Digging Deeper:
University of Georgia weighs in on Mulch Volcanoes:
http://apps.caes.uga.edu/urbanag/Home&Garden/indexFS.cfm?storyid=2710


Wednesday, March 27, 2013

Treat Yellowing Leaves on Broad-leaved Evergreens


Are your Camellias or Hollies showing yellowed leaves this time of year? Some leaves are naturally aging and yellowing. Other plants with yellowed leaves have a condition known as chlorosis and may include Pieris, Illicum, Rhododendron, Camellia, Ilex (Holly), Gardenia and other broad-leaf evergreens. The yellowing is typically due to one of two causes. The plants may need a Nitrogen fertilizer or they may need the application of the micronutrient Iron. 

This yellowing of foliage or chlorosis can also occur in potted houseplants such as Citrus, Ficus and Jasminum. 

How to tell?
CrabappleLandscapExperts will examine the plants carefully.

Nnitrogen Deficiency, Flordia.edu

Nitrogen Deficiency
When a plant lacks the macro-nutrient Nitrogen, older or lower leaves will yellow uniformly and often drop. The plant will transfer available nitrogen to its growth tips and new leaves.


Nitrogen Treatment
The LandscapExperts add Nitrogen by adding organic sources such as compost, well-rotted manure, fish emulsion, or commercial fertilizers. Water-soluble fertilizers designed as foliar feeders are easily mixed and sprayed onto the foliage. We also ensure that adequate Nitrogen fertilizer penetrates the soil and root ball. Our mixtures that are high in Nitrogen, denoted by the first number in the formula. The LandscapExperts always follow the directions for application to avoid over-feeding that can damage plants.


Iron Deficiency, Cornell.edu
Iron Deficiency
On the other hand, Iron deficiency symptoms are first expressed in the new growth or young leaves. Iron-deficient leaves show a characteristic inter-veinal chlorosis, with the leaf blades turning pale green to yellow, but the veins remaining dark green. Iron deficiency often goes along with Zinc and Manganese deficiencies, and these are all micronutrients that plants need for good growth. The new leaves are not producing enough green chlorophyll because of the lack of the essential micro-nutrient, Iron, which is a component of the chlorophyll molecule.

Iron Chelate Treatment
Iron Chelate (pronounced KEY-late) is a nutritional supplement that provides a soluble source of “liquid iron” that is immediately accessible to plants. It is commonly used as a foliar spray to treat the symptoms, and provides quick and easy correction of iron deficiencies. The leaves typically green up in less than a week! Liquid Iron is chelated iron with copper, manganese and zinc. A small amount goes a long way, particularly for potted plants -- only a 1/2 teaspoon per quart of water is advised.

Fast-acting Iron Chelate is often mixed with seaweed and other organic formulations as a broad spectrum tonic for plants. Repeat monthly. It aids in the production of vigorous dark green plant growth and corrects micro-nutrient deficiencies.


Wednesday, March 20, 2013

Shape-up and Re-pot Leggy Houseplants


Spring arrived at 7:02 am ET today, Thursday, March 20!3! We say Welcome! 

Late Winter / Early Spring is the perfect time to re-pot and shape-up leggy houseplants that have survived the winter indoors. Crabapple LandscapExperts can also advise you on how to care for large display tropicals inside the Sales Office or Residents' Clubhouse.

Pinching, Pruning and Shaping
Many houseplants need regular pinching back to keep them shapely. These include coleus, grape ivy, Swedish ivy, philodendron, arrowhead plant, polka-dot plant and wandering Jew. Houseplants grown as a topiary or on a topiary frame also need frequent pinch training.

Others need regular pruning once a season to maintain their appearance and vigor, keeping them compact, dense and healthy. Lipstick plant, for example, benefits from pruning back a third after flowering while Columnea is pruned in Spring to encourage re-flowering. 

Still others like Ficus benjamina, Fittonia and Pilea may need the removal of dead or crossed branches or damaged wood.

Vines such as Pothos produce trailing stems that can become lanky and leggy, with long gaps between the leaves, particularly in conditions of low light. Pinching the growing tips just above a leaf node will encourage the plant to put out new stems and bushier growth.

Grooming 
Grooming is a good idea for all houseplants, and consists of removing yellowing or dead leaves for an improved overall appearance. To encourage even growth, rotate houseplants by a window a quarter turn each week, causing them to adjust to the source of light in the room.

Is Repotting Needed? Indications: 
Roots growing out of the drainage holes at the bottom of the pot
Water runs down the sides and out the bottom without soaking into the soil
Top-heavy plants that fall over
Plants are straggly, pale, and have stopped growing
Thick roots circle around inside the pot

Repotting
Late winter / early spring is the ideal time to replant houseplants, since it is just prior to their spring growth spurt. Water the plant then gently remove it from the pot and lay it on its side.  Inspect the roots and soil.

Larger Pot 
For a larger plant, gently tease the roots apart and repot in a larger pot. Trim off dead or rotting roots at this time.
Place fresh soil in the bottom of the pot in order to keep the root ball at the same level, then place the plant in the pot and settle it, making sure it is centered and upright. Add potting soil around the sides, pressing down to firm the soil. Water in thoroughly.

Same Pot with Root Pruning
To keep the plant the same size, root prune by shaking off excess soil, and then using either utility scissors or a long, serrated bread knife, reduce the root system an inch or so all the way around, up to 25% of the root ball. Clean the pot by scrubbing with a 10% bleach/water solution, rinse, dry, then re pot the plant in the same pot with fresh soil. 

Light Maintenance
For light maintenance, simply top dress by scratching up the surface of the root ball before refreshing the top layer with fresh potting soil, but make sure the top of the root ball remains about ½ inch below the pot rim to accommodate watering.

Quick Recovery
Repotted plants will need a few weeks to recover from repotting, so water regularly, hold off on fertilizer, and keep the plant in a brightly lit location, but not direct sunlight. 

CrabappleLandscapExperts advise commercial and residential managers and HOAs that interior plantscaping:
adds to a feeling of well-being,
reduces stress indoors (and out),
improves air quality by increasing oxygen and humidity and decreasing carbon dioxide dust motes
reduces background noise 

Wednesday, March 13, 2013

Schedule Spring Core Aeration for Warm-Season Grasses


Creeping, warm-season turf grasses such as Bermudagrass and Zoysia  are particularly inclined to build up a layer of thatch. Thatch is an accumulation of dead leaves, cut grass clippings, dead roots and miscellaneous debris. It settles at the soil level of the individual grass plants that make up a lawn and prevent water and nutrients from reaching the roots. Crabapple LandscapExperts recommend Core Aeration as the best way to counteract thatch. 

Hollow tines in Aerator
What is Core Aeration?
Core aeration is the removal of small cylinders or “cores” of soil from compacted lawns (especially those with a layer of thatch), creating spaces that allow the rain and fertilizer applications to soak into the root zone and the roots of the turf to breathe and expand. The hollow tines of an aeration machine pop out ½ inch diameter tubes of soil about 3-4 inches long, and deposits them on the lawn where they soon dissolve.

Spring is Ideal  for Core Aeration of Warm Season Turf 

March through July
Your Crabapple LandscapExperts Rep can evaluate your turf and recommend this procedure if needed. Some indicators include: a thatch layer thicker than ½ inch;  underlying soil is heavy clay; the lawn is heavily used causing thin areas; or if the turf is only shallowly-rooted.

The best time to Core Aerate a Bermuda or Zoysia lawn is March through June/July when warm season grasses are emerging from winter dormancy and beginning a vigorous period of growth as the soils warm up. Maximum benefit and fastest recovery occurs when lawns are aerated at this time.

Core aeration is not recommended on newly-seeded lawns. For complete details contact your Crabapple Rep today to schedule this beneficial horticultural practice and improve the growth and look of the lawns on the properties you manage. 

Digging Deeper
See Crabapple's other blogs on this important topic: 

A Link to Crabapple's Video on Core Aeration: 

Don't miss any of the new  short landscaping demos and best practices on the CrabappleLandscape YouTube Channel. Subscribe now to be notified when a new video comes online!